How To
How to Disable Lens Search in Google Chrome – Android Result

Google Chorome is the biggest browser in world both Windows and Android. Google Chrome makes it easy to disable the Lens search feature and bring back the traditional “Search Google for This Image” context menu option. Here’s how you can do that in Chrome on desktop and Android.
Chrome’s Lens search feature is extremely useful as you can use it to find more information about your selected image. However, if you’d prefer the old reverse search method, it’s easy to disable this new feature and get that old option back.
You can always re-enable the Lens search option if you want.
How to Change the Word Effects in Facebook Messenger – Android Result
Disable Chrome’s Lens Search Option on Android
To deactivate the Lens search option on your Android phone, first, launch Chrome on your phone.
In Chrome, tap the address bar, type the following, and press Enter:
chrome://flags
On the “Experiments” page that opens, at the top, tap the “Search Flags” box and enter the following:
Lens
In the search results, find “Google Lens Powered Image Search in the Context Menu.” Then, beneath this option, tap “Default.”
From the menu that opens, choose “Disabled.”
Tip: Later, if you’d like to re-enable Lens search, choose “Default” in the menu.
In Chrome’s bottom-right corner, you’ll see “Relaunch.” Tap this option to close and reopen the browser.
You’re all set. From now on, when you tap and hold on an image in Chrome, you will see the traditional “Search Google for This Image” option.
How to Change or Remove or Add a Drop-Down List in Google Sheets
Turn Off Chrome’s Lens Search Feature on Desktop
To get rid of the Lens search option from your desktop, first, launch Chrome on your computer.
In Chrome’s address bar, type the following and press Enter:
chrome://flags
At the top of the page, in the “Search Flags” box, type the following and press Enter:
Lens
In search results, next to “Enable Lens Features in Chrome,” click the menu and choose “Disabled.”
Tip: In the future, to reactivate the Lens search option, choose “Enabled” from the menu.
Bring your changes into effect by clicking “Relaunch” at the bottom-right corner of Chrome.
When Chrome reopens, the Lens search option will be gone and you’ll have the old Google Image Search option instead. Happy image searching!
Windows 10 and Windows 11 Tips and Tricks: How to Enter Task Manager as Admin
How To
How to enable the swipe to type or cursor control feature on Samsung keyboard?

In the ever-evolving world of smartphone technology, convenience and efficiency are paramount. Samsung, as a leader in innovation, recognizes this and offers users the incredible swipe-to-type and cursor control feature on its keyboard. This intuitive functionality allows you to effortlessly glide your finger across the keyboard, spelling out words with remarkable ease, or precisely navigate through text using a cursor.
This guide will be your key to unlocking the potential of these features, showing you how to enable swipe-to-type and cursor control on your Samsung keyboard. By delving into your device’s settings, you will discover the simple, yet powerful steps needed to harness these capabilities. Whether you’re a fan of swift, gesture-based typing or require pinpoint accuracy in editing text, Samsung’s keyboard offers you the tools to customize your digital communication experience. Join us as we explore the intricacies of enabling swipe-to-type and cursor control, elevating your typing and editing skills to new heights.
Enable the swipe to type or cursor control feature on Samsung keyboard
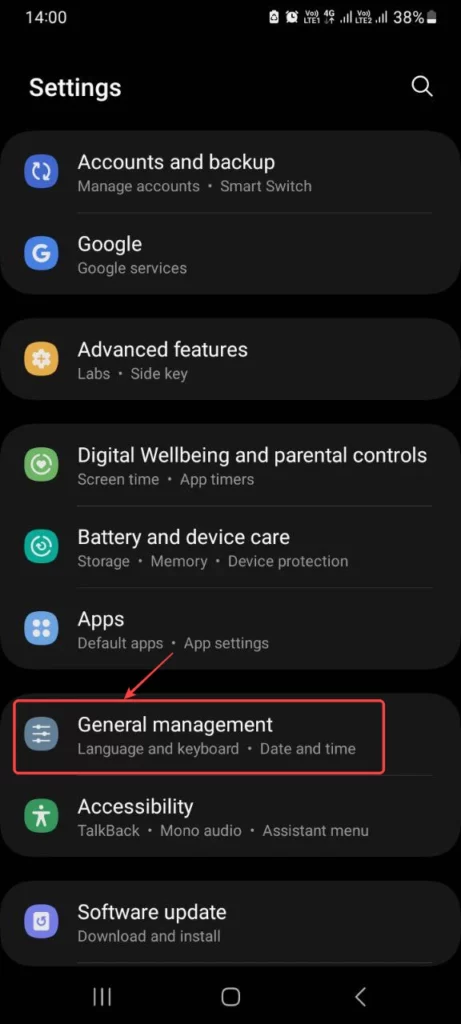
- Open the Settings menu, scroll down, and tap on the General management option.
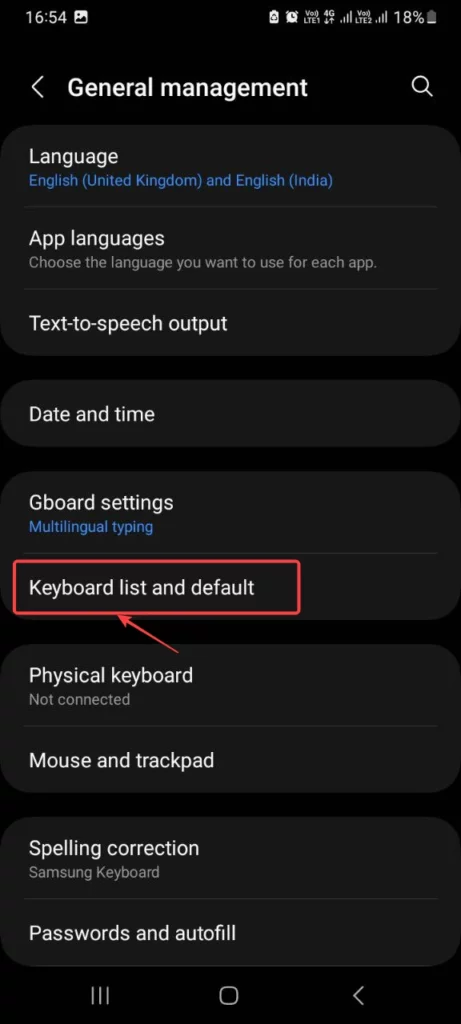
- Then, tap on Keyboard list and default.
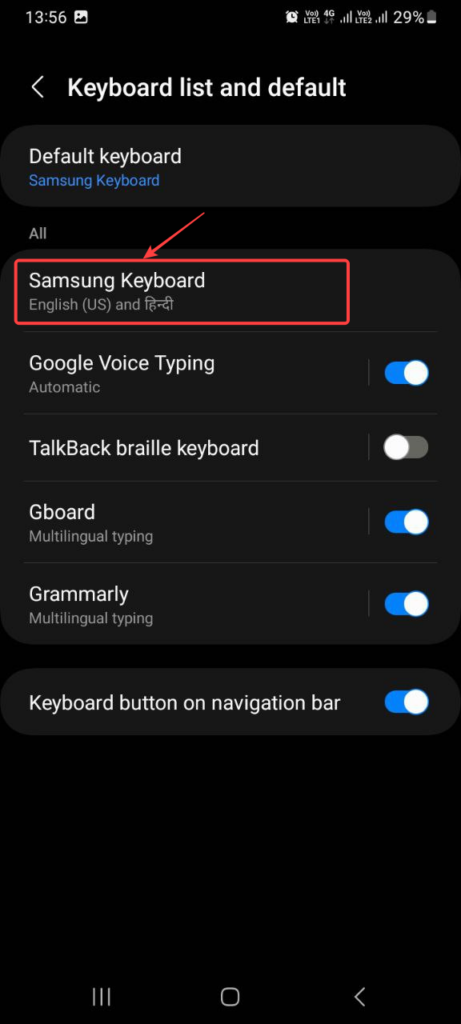
- Now, click on the Samsung Keyboard option.
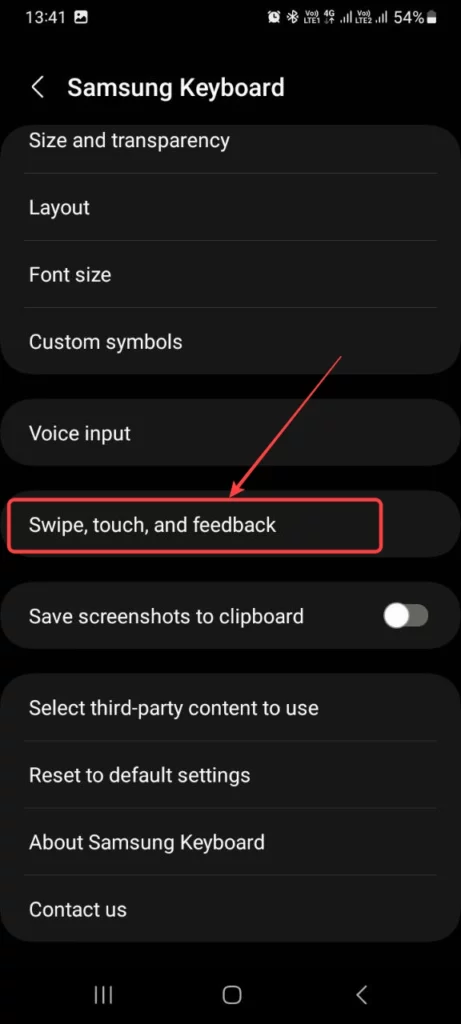
- Here, scroll down and tap on the Swipe, touch, and feedback option.
- Click on the Keyboard swipe controls option.
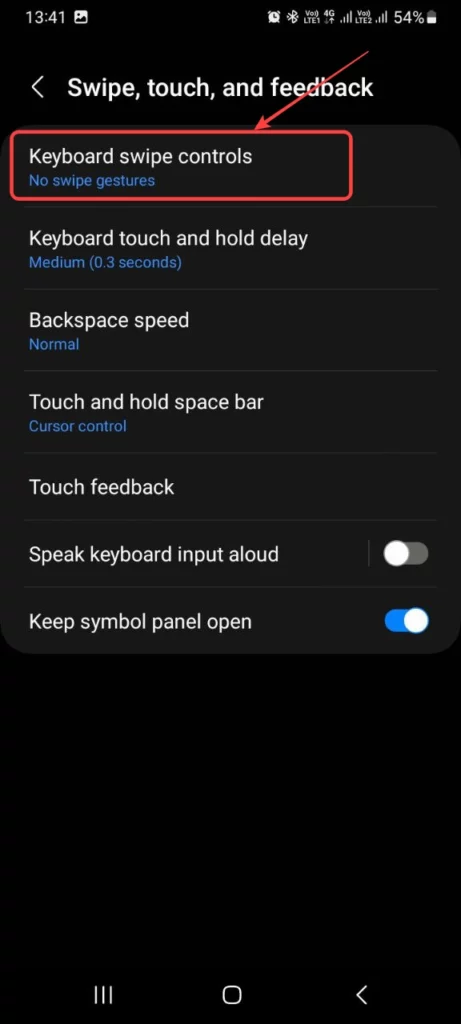
- Finally, you can turn on the Swipe to type or Cursor control feature.

We hope that this article has been able to provide you with some helpful tips and tricks for How to enable the swipe to type or cursor control feature on Samsung keyboard. Now you can share your experiences or capture important information without any hassle!
How To
How to adjust the size of the Samsung Keyboard?

In the realm of smartphone customization, the ability to adapt even the tiniest details can significantly enhance your digital experience. The size of your keyboard, for instance, plays a crucial role in your typing comfort and efficiency. Samsung, a pioneer in user-centric innovations, has provided a solution that allows you to tailor the keyboard size according to your preferences. This guide will walk you through the steps required to seamlessly adjust the size of the Samsung Keyboard, putting the power of personalization in your hands.
By exploring your device’s settings, you’ll uncover the means to resize the keyboard, whether you’re looking to maximize screen real estate for larger keys or seeking a compact layout for one-handed usage. Whether you’re a swift typist or someone who values precision, this functionality empowers you to fine-tune your interaction with your Samsung smartphone. Join us as we delve into the intricacies of resizing the Samsung keyboard, and unlock a new level of comfort and efficiency in your digital communication.
Adjust the size of the Samsung Keyboard
- Open the Settings menu, scroll down, and tap on the General management option.

- Then, tap on Keyboard list and default.

- Now, click on the Samsung Keyboard option.

- Here, scroll down and tap on Size and transparency.
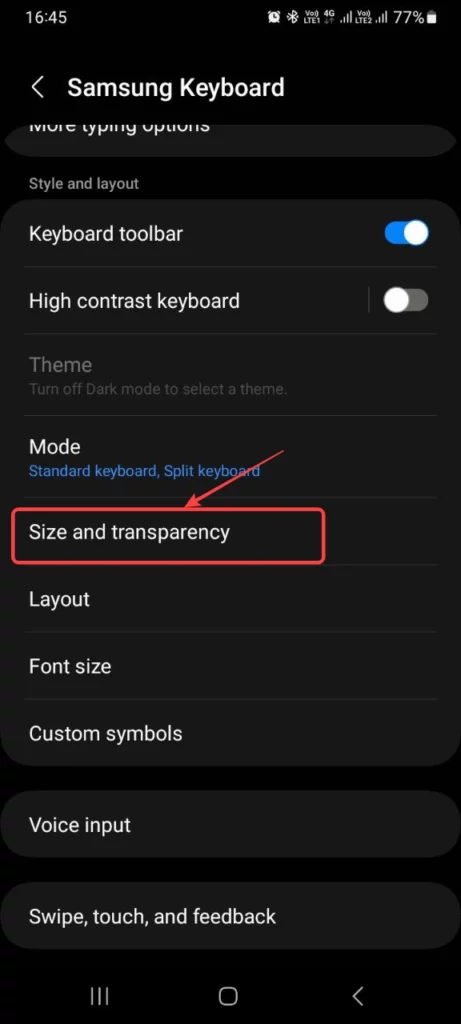
- Finally, you can drag the handles on the sides of the keyboard to adjust its size.
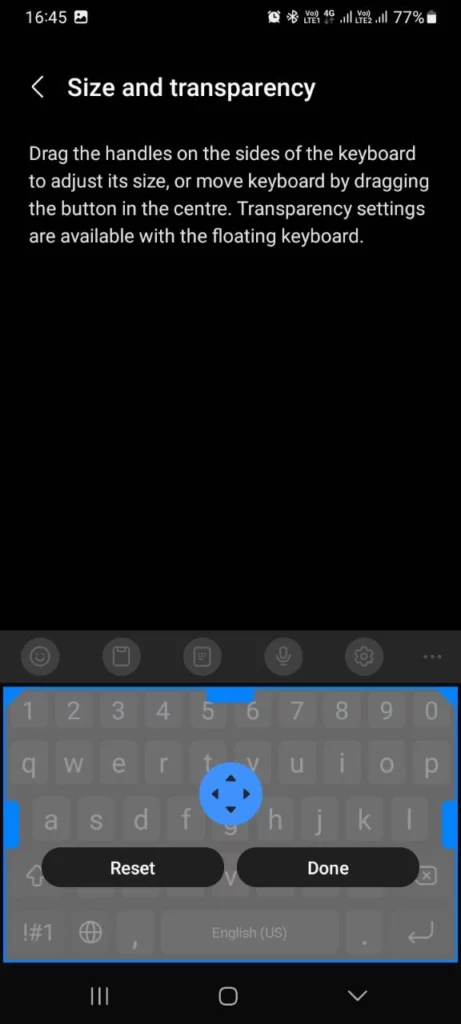
We hope that this article has been able to provide you with some helpful tips and tricks for How to adjust the size of the Samsung Keyboard. Now you can share your experiences or capture important information without any hassle!
How To
How to enable or disable talkback in Smasung smartphone?

n the realm of smartphone accessibility, Samsung has pioneered features that cater to diverse user needs, and “TalkBack” stands as a testament to their commitment. This ingenious feature transforms visual information into spoken feedback, facilitating smartphone interaction for individuals with visual impairments. If you’re looking to seamlessly enable or disable TalkBack on your Samsung smartphone, you’re about to embark on a journey of customization and inclusivity.
This guide will walk you through the steps required to navigate your Samsung device’s settings and toggle the Talkback feature according to your preferences. Whether you’re an advocate of accessibility or require temporary adjustments, the power lies at your fingertips. From enhancing usability for visually impaired users to assisting in specific scenarios, TalkBack opens new dimensions of interaction. Join us as we delve into the intricacies of enabling or disabling talkback , and uncover how Samsung’s commitment to innovation is making technology accessible to all.
Enable or disable talkback in Smasung Smartphone
- In the Settings menu, scroll down and click on Accessibility.

- Then, click on the TalkBack option.
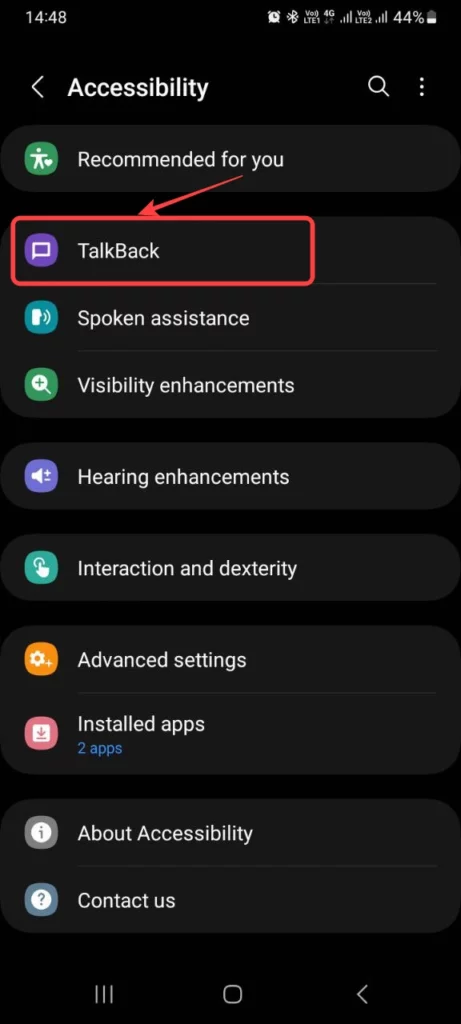
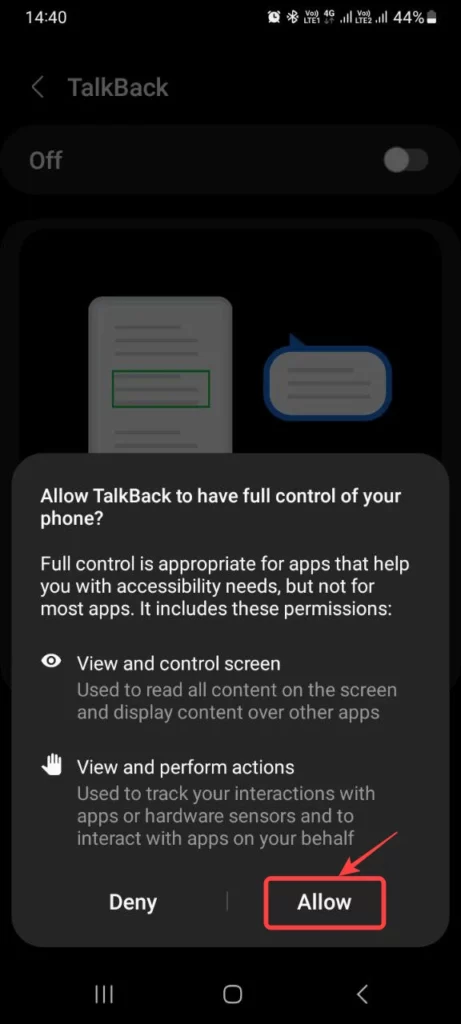
- Now, tap to switch on the TalkBack.

- Finally, choose Allow to enable TalkBack.
We hope that this article has been able to provide you with some helpful tips and tricks for How to enable or disable talkback in Smasung smartphone. Now you can share your experiences or capture important information without any hassle!
