News
Win11 is unbearable, teach you a trick to solve the Bluetooth problem

Win11 has greatly changed the interface interaction of the system, and the visual sense of UI has become more modern. However, does this mean that Win11 is better than before? Obviously not. At least in some basic interactions, Win11 is far from enough – such as the management and switching of Bluetooth devices.
Win11 still can’t connect and switch Bluetooth devices at any time
We know that in many mobile phones, we can easily manage and switch Bluetooth devices. For example, after pulling down the notification bar of the mobile phone, you can click the small triangle next to the Bluetooth switch to expand the Bluetooth list, where you can quickly connect, disconnect, and select Bluetooth devices. But in Win11, this cannot be done. Even if there is a Bluetooth icon in the taskbar of Win11, if you want to manage Bluetooth, you can only operate it in the settings panel, instead of directly popping up the shortcut panel to manage it like WiFi.
Win11 must go to the settings panel to manage bluetooth
I have to say that the flaws in this detail of Win11 are very unpleasant. Especially friends who often use Bluetooth headsets and Bluetooth keyboards and mice will definitely understand how inconvenient this is. How to solve this problem? Maybe you should try this gadget.
ToothTray: https://github.com/m2jean/ToothTray
This is an open source small software. Its function is to generate a Bluetooth icon in the taskbar of Win11, and click to pop up a list of Bluetooth devices, which is more convenient to manage.
Small icon of ToothTray, right click to manage Bluetooth
ToothTray is very easy to use and can be run directly without installation. It can be seen that after using ToothTray, you can directly manage Bluetooth devices, and connect or disconnect these Bluetooth devices at any time, which is much more convenient than the setting panel that comes with Win11.
In general, ToothTray does solve the problem of inconvenient management of Bluetooth in Win11. However, there is also news that Win11 will add a Bluetooth shortcut panel similar to the current WiFi management in future versions. At present, the new function is already being tested. I hope the new version of Win11 can bring surprises.
News
How to take Screenshot On Samsung Galaxy A54
Taking screenshots on our smartphones is becoming increasingly common and has become an invaluable part of our technology lives. But do you know how to take a screenshot on your Samsung Galaxy A54?
Whether you’re trying to capture a text conversation with a friend or just need to grab something quickly from the internet, we’ve got you covered with this step-by-step guide. Keep reading to find out how easy it is to take screenshots on your Samsung Galaxy A54!
How to take a screenshot using the physical buttons
- To take a screenshot using the physical buttons, simply press and hold the power button and the volume down button at the same time.
- The screen will flash, indicating that a screenshot has been taken.
- You can find the screenshot in your gallery app.
How to take a screenshot using Palm Swipe
Palm Swipe is a feature that allows you to take a screenshot on your Galaxy S23 Ultra by swiping the edge of your hand across the screen. To use Palm Swipe, follow these steps:
- Enable Palm Swipe: Go to Settings > Advanced features > Motions and gestures. Enable Palm swipe to capture.
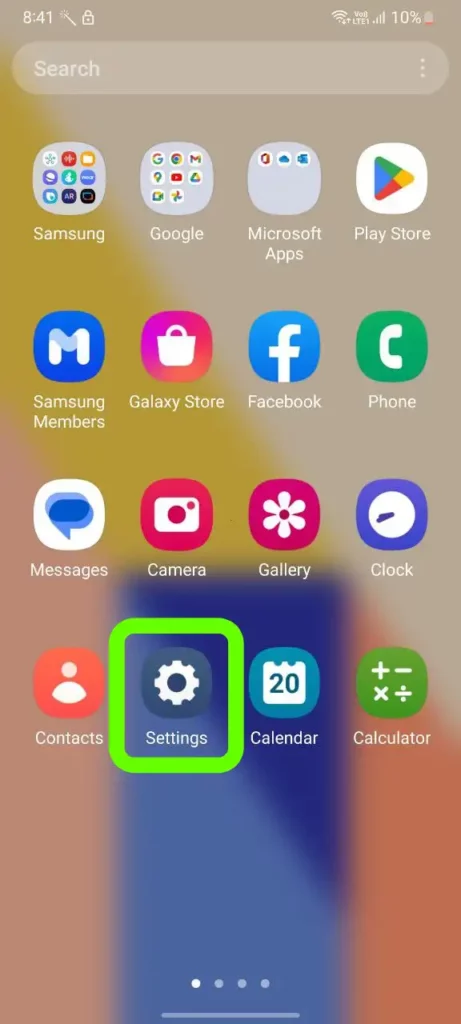
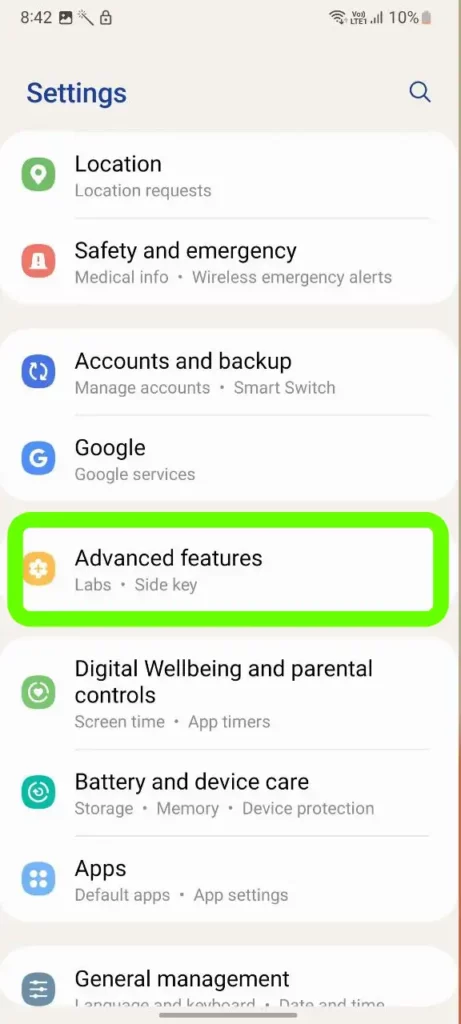
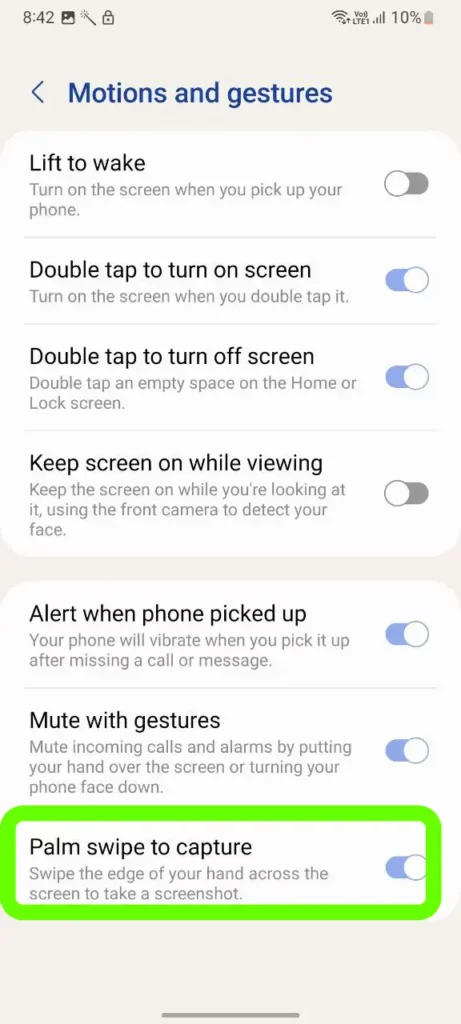
- Take a screenshot: Place your hand vertically on either side of the screen, then swipe across the screen from one side to the other as if you were taking a photo.
How To
How to enable Ethernet tethering on Samsung Galaxy A53 smartphone

Are you looking to learn how to ethernet tethering your Samsung Galaxy A53? With the ability to ethernet tethering, you can share your mobile data connection with other devices, allowing them to access the internet without a Wi-Fi network. Ethernet tethering has traditionally been done using Wi-Fi connections, but with the latest technology, you can now set up tethering using Ethernet connections.
In this guide, we’ll walk you through the steps of setting up Ethernet tethering on your Samsung Galaxy A53 smartphone. We will also discuss some of the benefits and drawbacks of using this method compared to other ways of tethering.
Enable Ethernet tethering on Galaxy A53 smartphone
- First, go to “Settings“

- Then, click on “Connections“

- Now, you will see “Mobile Hotspot and Tethering” Option, click on it.

- Then, enable “Ethernet tethering“.
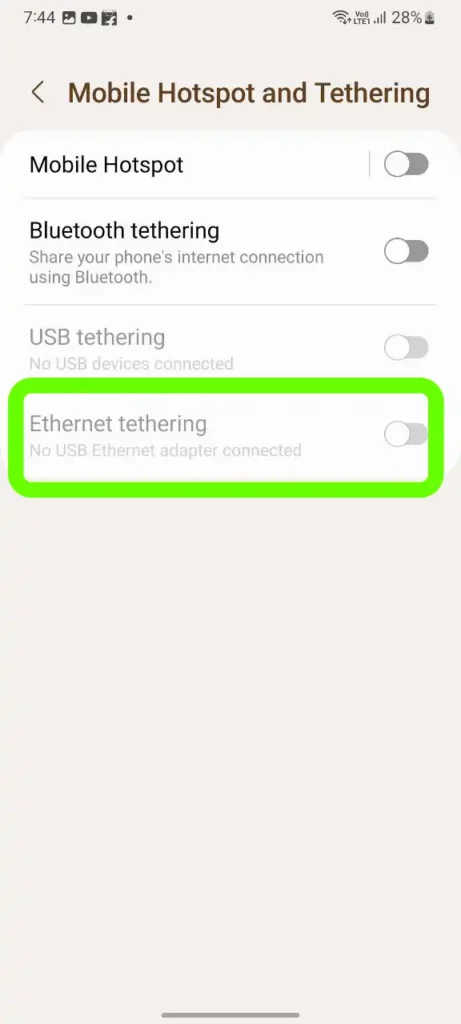
We hope that this article has been able to provide you with some helpful tips and tricks for How to enable Ethernet tethering on Samsung Galaxy A53 smartphone. Now you can share your experiences or capture important information without any hassle!
News
Fix: Samsung Galaxy Z Flip 3 user facing WiFi connecting Issue
Tech enthusiasts across the world have been going wild since Samsung announced the launch of the much-anticipated Samsung Galaxy Z Flip 3. From its impressive design to its cutting-edge features, this latest smartphone model is a must-have device for tech savvy users.
Unfortunately, however, some users have reported facing issues in connecting to Wifi networks with their smartphone. If you’re having trouble getting connected with your Galaxy Z Flip 3, don’t worry – we’ve got you covered! In this blog post, we’ll be taking a look at how to fix user-facing WiFi connecting issues on your Samsung Galaxy Z Flip 3. Let’s get started!
How to fix Galaxy Z Flip 3 WIFI not working issue
Restart your device
If your Samsung Galaxy device is not connecting to WiFi, the first thing you should try is restarting your device. To do this, simply power off your phone and then turn it back on. This should fix the problem if it was caused by a temporary glitch.
Toggle the Airplane Mode
If your Samsung Galaxy device is having trouble connecting to WiFi, one of the first things you should try is toggling the Airplane Mode. This setting turns off all wireless connections on your phone, which can sometimes be the cause of the problem. To toggle Airplane Mode, simply pull down the notification shade and tap on the Airplane Mode icon.
Restart Wifi Connections
If your Samsung Galaxy device is having trouble connecting to WiFi, you can try restarting your WiFi connections. To do this, go to Settings > Network & Internet > WiFi and toggle the WiFi off and on. You can also try forgetting the WiFi network and then reconnecting to it. If you’re still having trouble, you can try resetting your device’s network settings. To do this, go to Settings > General Management > Reset > Reset Network Settings.
Connect a different device
If your Samsung Galaxy device is having difficulty connecting to your WiFi network, there are a few things you can try. First, try connecting a different device to the WiFi network. If that device is able to connect without any problems, then the issue is most likely with your phone and not the WiFi network.
Check update
If your phone is having trouble connecting to WiFi, the first thing you should do is check for any available updates. To do this, go to Settings > About device > Software update and see if there are any updates available. If there are, install them and see if that fixes the problem.
Restore Factory
If your Samsung Galaxy device is having trouble connecting to Wi-Fi, you can try restoring the factory settings. This will reset all of your network settings, including your Wi-Fi passwords, so make sure to write them down before you begin. To restore your Galaxy S Ultra to its factory settings:
- Open the Settings app and tap “General management.”
- Tap “Reset.”
- Tap “Factory data reset.”
- Tap “Reset device.”
- Enter your PIN or password if prompted.
- Tap “Continue.”
- Tap “Delete all.”
Could It Be A Hardware Issue?
If your phone is having trouble connecting to WiFi, it could be a hardware issue. So you should visit Samsung customer care centre for repair your device.


