10 Best Galaxy Note 10 New Features and Settings You Should Know About

Welcome to the home of the best How-to guides for your Samsung Galaxy needs. In today’s article, we will go over the Samsung Galaxy Note 10 Settings and features. If you’re wondering Galaxy Note 10 New Features and Settings. So we’ll show you how to use it on these models.
10 Best Galaxy Note 10 New Features and Settings You Should Know About
The Galaxy Note10 and Galaxy Note10+ are packed with powerful innovations designed to help users take their mobile experience to the next level.
To help them get the most out of these convenient features, Samsung Newsroom has compiled a list of ten functions and settings users should consider when setting up their new device. Whether you’re new to the Note series or you’re a long-term fan who’s just upgraded to the latest edition, the features outlined below will help you customize your phone in ways that work for you.
1. Customize Air Actions
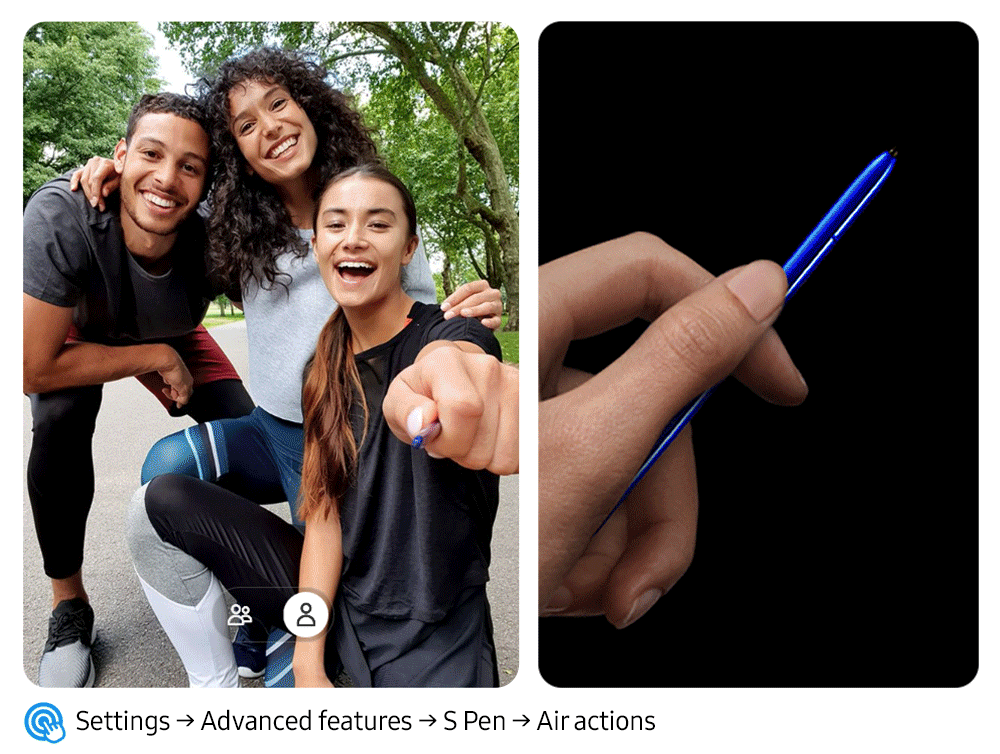
As you may have read in our recent in-depth article, the Galaxy Note10’s new S Pen Air actions transform the Note series’ signature tool into a magic wand for controlling your device. The gesture-based controls are completely customizable, which means you can specify exactly which functions you’d like them to trigger within specific apps – such as the Camera, Gallery and Samsung Notes.
For example, using the S Pen to trace a clockwise circle in the Camera app will, by default, trigger the camera to zoom into the frame. However, you can also customize this gesture to change camera modes, switch cameras, zoom out and more, if any of those functions would be more comfortable for you.
You can also specify which frequently used app or feature you’d like to launch when you press and hold the S Pen’s button. This saves users time by making it easier for them to access the functions they need.
2. Adjust Your Side Key Settings
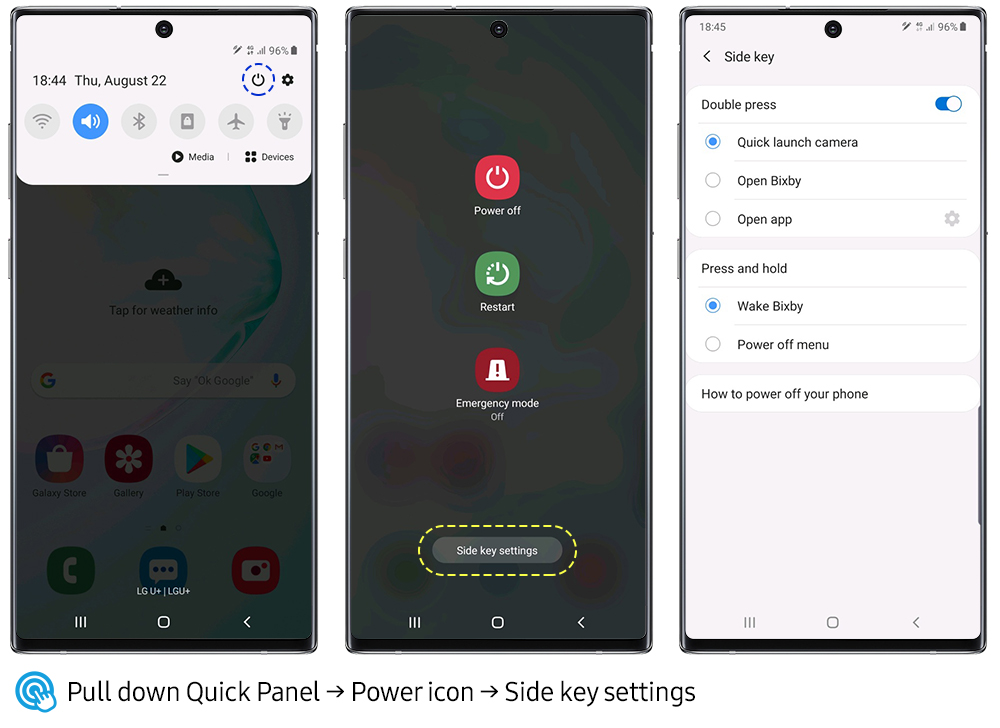
The Galaxy Note10’s sleek and slim design includes an all-new multifunctional key located beneath the volume rocker on the devices’ left-hand side. A double press allows you to instantly open the camera, Bixby or a frequently used app of your choosing, while a press and hold will wake Bixby or pull up the power off menu.
Speaking of, the Galaxy Note10 also introduces more ways for users to power down their device. Now, in addition to pulling up the power off menu with a press and hold of the side key, users can easily turn off their phone by (1) tapping on the power icon integrated into the Quick Panel, (2) pressing and holding the side and volume down keys, or (3) asking Bixby to do it directly.
The side key’s settings can be accessed by swiping down on the Quick Panel, tapping the power icon and selecting ‘Side key settings,’ or by pressing and holding the side key itself.
3. Pick Your Favorite Pens
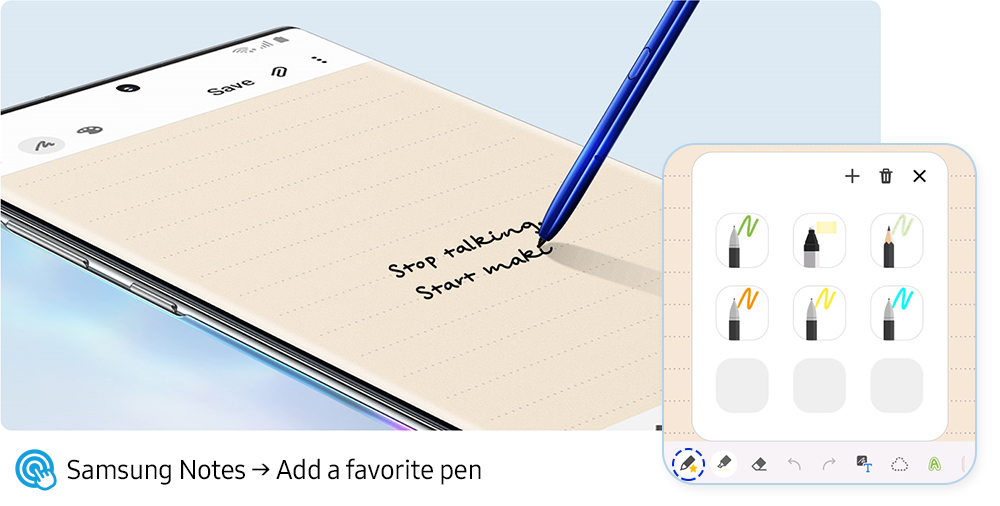
The Galaxy Note10’s enhanced Samsung Notes app makes it easier for users to get down to work by allowing them to save their favorite pens in an instantly accessible tab.
Once users open Samsung Notes and tap on the scribble icon at the top, they’ll see an icon of a pen marked with a golden star in the bottom left corner of the screen. Tapping that icon will pull up a handy tab containing slots to save up to nine unique pens. With six types of pens, an array of thickness options, and dozens of colors available, it’s easy to find and save the right pen for the job.
Once they’re saved, all it takes to pull up the pen you need when composing a note is a press of the S Pen’s button. Each subsequent press will switch to another favorite pen in your collection.
4. Step Up Your Screen Recordings
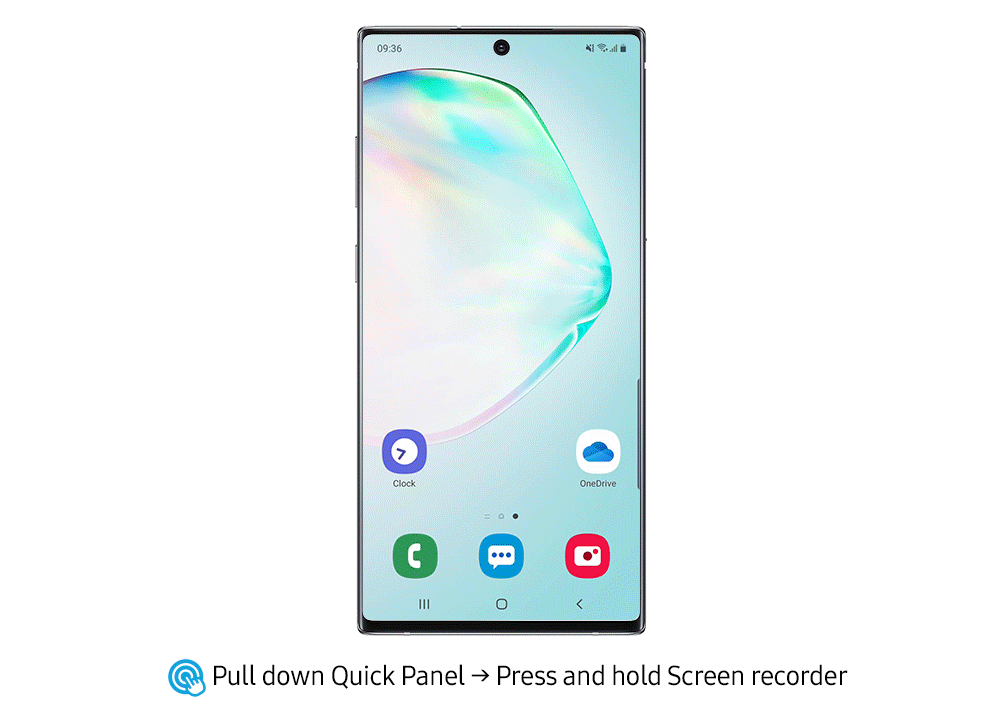
The Galaxy Note10’s new Screen recorder not only makes it easy to record what’s on your screen, but also features a picture-in-picture function that allows users, such as vloggers and gamers, to use the front camera to add reactions and commentary to their videos.
To start a recording, simply pull down the Quick Panel and tap on the Screen recorder icon. Once the recording starts, you’ll see icons in the top right corner to enable real-time S Pen annotation, and activate the front camera for the picture-in-picture function.
If you’d like to capture your voice while recording a picture-in-picture video, pull up the feature’s settings by pressing and holding ‘Screen recorder’ in the Quick Panel. There, you’ll find options to (1) record no sound, (2) record media sounds, and (3) record ‘media sounds and mic.’ The settings also allow you to specify precisely how large you would like your picture-in-picture video to be, and select a preferred video quality.
5. Link to Windows
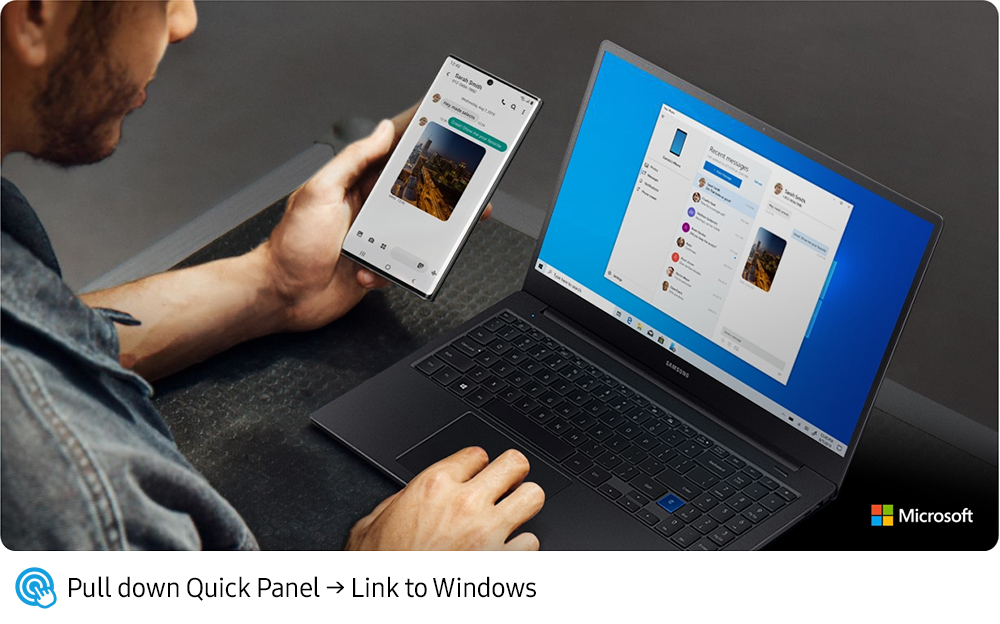
To help users work more comfortably and efficiently, the Galaxy Note10 features Link to Windows integrated directly into its Quick Panel. Now, rather than bouncing from one screen to the other, users can easily connect their Galaxy Note10 to their Windows 10-based PC and mirror their phone’s screen, send and receive messages, and view notifications – as well as up to 25 recent photos – directly from their computer.
Link to Windows can be launched via the Quick Panel or by accessing Settings > Advanced features. Once the user logs in to their Microsoft account, the Galaxy Note10 automatically links to their PC. It’s as simple as that.
6. Connect to Samsung DeX for PC
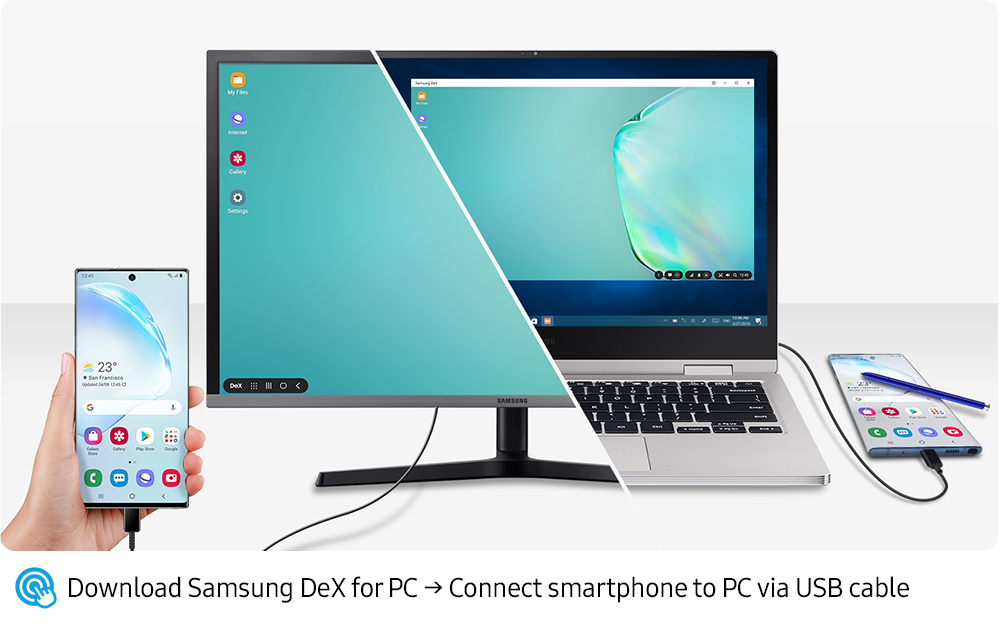
The Galaxy Note10 takes multitasking to the next level by making Samsung DeX2 even easier to use. Now, all it takes to expand your mobile experience to your Windows PC or Mac is a simple USB cable.
Getting started is easy: simply access Samsung DeX’s official website on your PC or Mac to download and launch the Samsung DeX for PC installer, and connect your smartphone to your computer. Once everything’s set up, the program will automatically launch Samsung DeX via a window on your computer’s screen.
From there, you’ll be able to easily drag and drop files between your smartphone and PC, and enjoy more space to manage your go-to apps. In addition, even when it’s connected to your PC, your smartphone can still be used to make phone calls, send messages, and surf the internet.
7. Display Battery Percentage
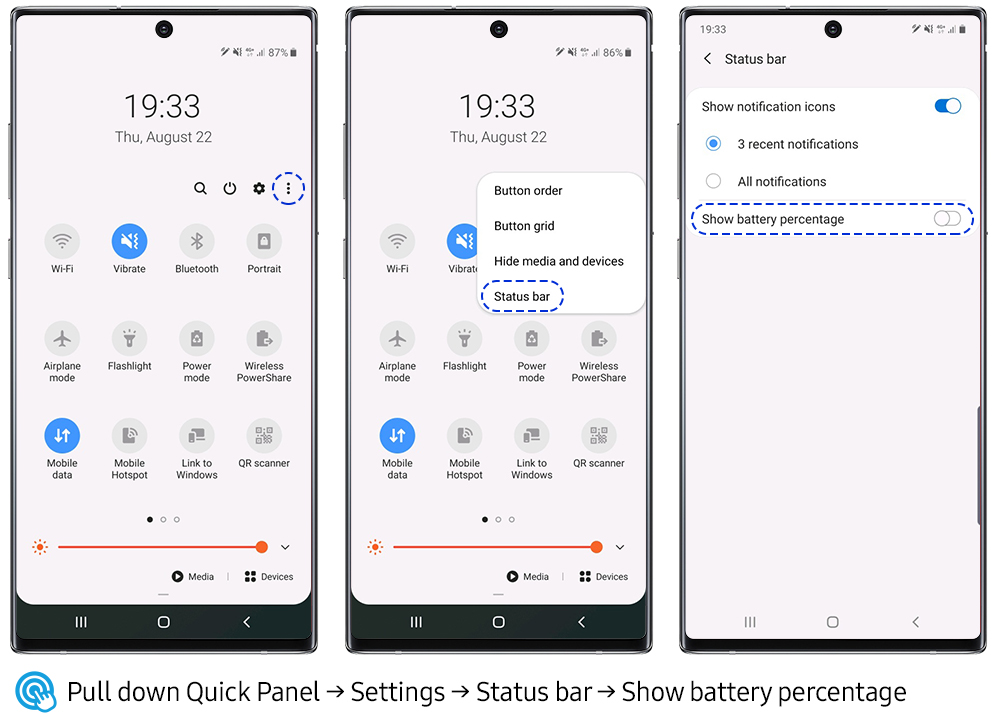
These days, we’re constantly working, connecting and creating on our mobile devices, which is why we like to keep a close eye on our smartphone’s battery level.
The Galaxy Note10’s default setting is to display battery level via a simple icon on the right side of the status bar. However, users who would like to know exactly how much power they have left can access Settings > Notifications > Status bar, where they’ll find options to display the exact battery percentage, and specify how many notification icons they’d like to see at the top of their screen.
The Galaxy Note10 also features AI software that optimizes battery usage based on how you use your device. To manage your device’s battery optimization, head to Settings > Device care > Battery > Power mode. There you’ll find various power modes for increasing performance and extending battery life, as well as an ‘Adaptive power saving’ function, which enables your Galaxy Note10’s AI to automatically adjust the power mode based on your usage patterns to save power when it’s not needed.
8. Enable Bixby Routines
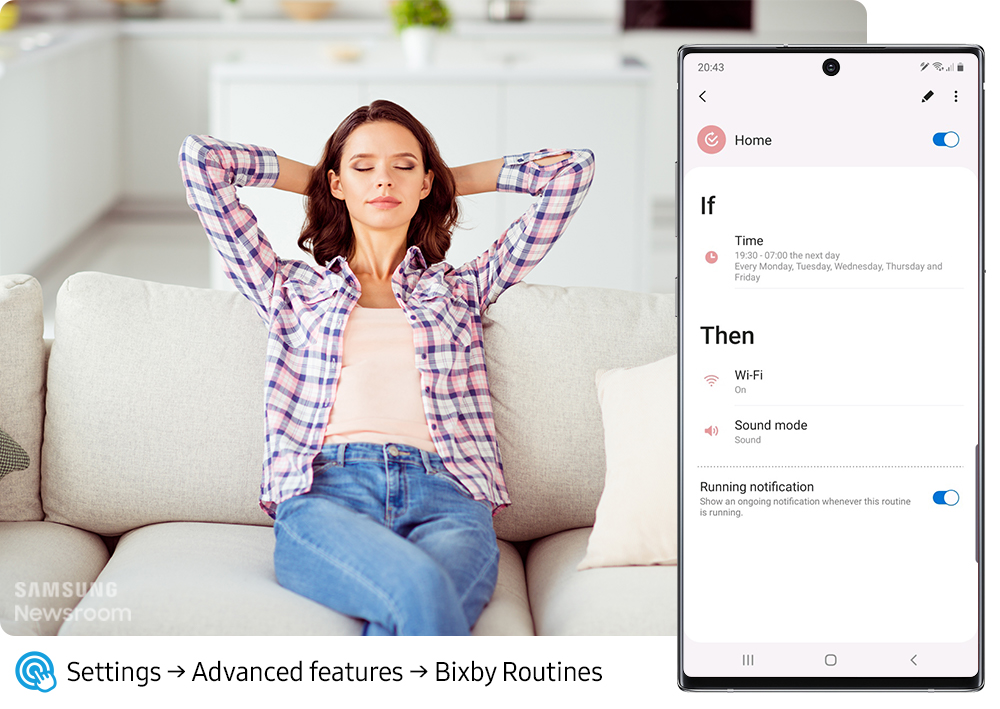
What if your smartphone were intelligent enough to optimize settings based on your daily routine – switching to Wi-Fi as soon as you got home, and automatically dimming the screen and activating its blue light filter to protect your eyes before you went to bed?
Bixby Routines on the Galaxy Note10 makes all that and more possible. The function utilizes machine learning to learn how you use your phone throughout the day, and recommends personalized routines that can streamline tasks to help you save more time.
The Galaxy Note10 features 14 preset Bixby Routines right out of the box, including ‘Good morning,’ ‘Work,’ ‘Home,’ ‘Before bed’ and ‘Driving.’ Best of all, creating your own Bixby Routines couldn’t be easier. Simply tap on the plus sign at the top of the menu to create a routine that works for you.
9. Rearranging Camera Modes
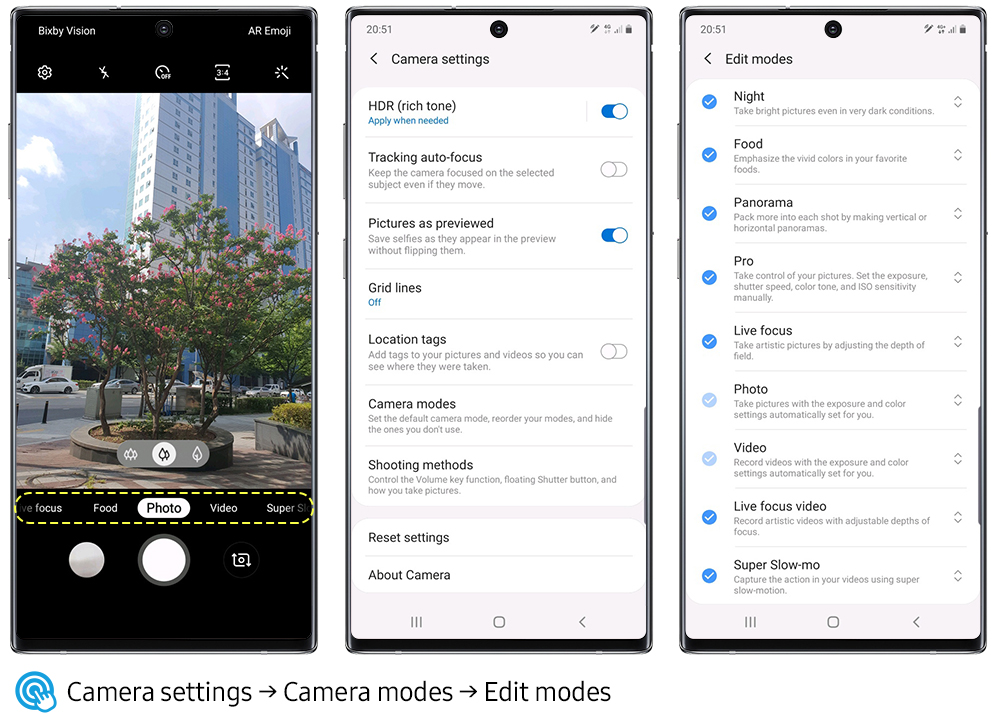
Because speed can be key when it comes to capturing incredible photos, the Galaxy Note10 allows you to rearrange the order of its camera modes so your most frequently used options come up first. The camera launches on Photo mode by default, and lets you designate the order of the camera modes to the left and right of Photo mode to make it easy to navigate to the mode you need.
If, for example, you like to take pictures of your food, place Food mode immediately before or after Photo. If you tend to use other modes more often than the basic Photo mode, tap on ‘Keep using last mode’ under the ‘Camera modes’ settings to enable the camera to launch on the last mode you used.
10. Quickly Access Brightness Settings
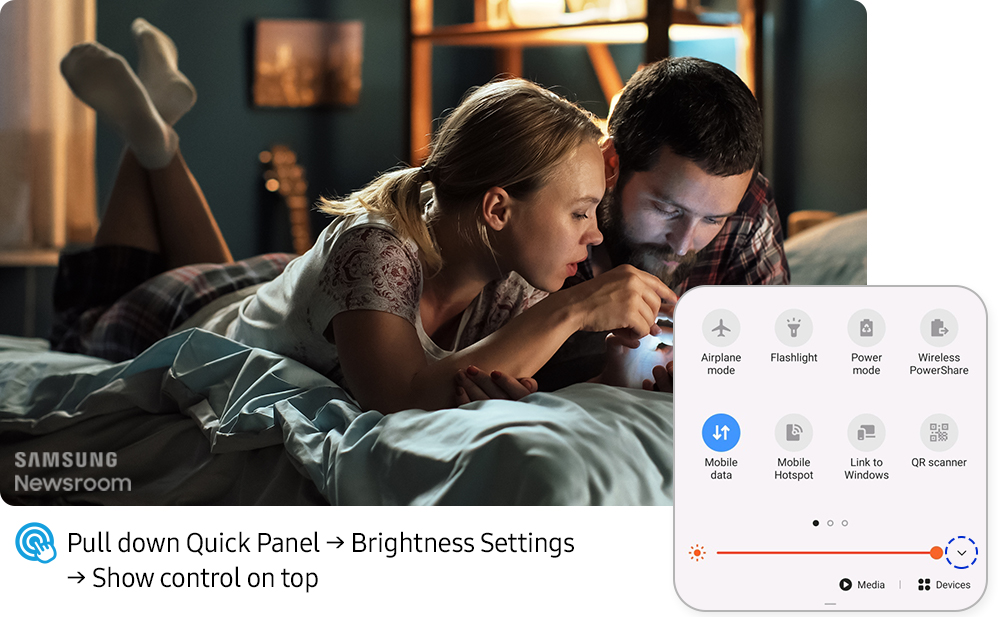
Sometimes – when watching a movie at a theater, for example – we’d like to be able to adjust our smartphone’s brightness quickly and easily. If you find yourself in these situations quite often, consider enabling the Galaxy Note10’s brightness control to be displayed above the notification panel.
To do so, simply swipe down on the Quick Panel, tap on the arrow to the right of the brightness control, and tap on ‘Show control on top.’ The display’s brightness settings also include an ‘Adaptive brightness’ function that allows the Galaxy Note10 to keep track of your brightness adjustments and apply them automatically when you use your device under similar lighting conditions.
For The Latest Activities And News Follow Our Social Media Handles:
- Facebook: AndroidResult
- Twitter: AndroidResult
- Instagram: AndroidResult

In the ever-evolving world of smartphone technology, convenience and efficiency are paramount. Samsung, as a leader in innovation, recognizes this and offers users the incredible swipe-to-type and cursor control feature on its keyboard. This intuitive functionality allows you to effortlessly glide your finger across the keyboard, spelling out words with remarkable ease, or precisely navigate through text using a cursor.
This guide will be your key to unlocking the potential of these features, showing you how to enable swipe-to-type and cursor control on your Samsung keyboard. By delving into your device’s settings, you will discover the simple, yet powerful steps needed to harness these capabilities. Whether you’re a fan of swift, gesture-based typing or require pinpoint accuracy in editing text, Samsung’s keyboard offers you the tools to customize your digital communication experience. Join us as we explore the intricacies of enabling swipe-to-type and cursor control, elevating your typing and editing skills to new heights.
Enable the swipe to type or cursor control feature on Samsung keyboard
- Open the Settings menu, scroll down, and tap on the General management option.
- Then, tap on Keyboard list and default.
- Now, click on the Samsung Keyboard option.
- Here, scroll down and tap on the Swipe, touch, and feedback option.
- Click on the Keyboard swipe controls option.
- Finally, you can turn on the Swipe to type or Cursor control feature.
We hope that this article has been able to provide you with some helpful tips and tricks for How to enable the swipe to type or cursor control feature on Samsung keyboard. Now you can share your experiences or capture important information without any hassle!

In today’s fast-paced digital world, content creation has become a crucial aspect of communication.
Whether you’re a business owner, educator, or content creator, the ability to generate engaging audio and video content is crucial.
That’s where Fliki AI steps in, offering a seamless solution to transform text into captivating videos and lifelike speech.
In this blog post, we’ll dive into the world of
Unveiling Fliki AI: Transforming Text to Videos and Speech
Fliki AI is a cutting-edge text-to-video and text-to-speech creator that empowers individuals and businesses to craft high-quality multimedia content within minutes.
It’s designed to bridge the gap between text-based information and dynamic audiovisual presentations.
With Fliki AI, you can bid farewell to the complexities of video editing and laborious voiceovers. Whether you’re explaining complex concepts, narrating stories, or presenting information, Fliki AI has you covered.
How to Start Your Fliki AI Free Trial: Easy Step-by-Step Guide
Getting started with Fliki AI’s free trial is a breeze! Follow these simple steps to activate your trial and begin exploring the fantastic features it offers.
Step 1: Click on the special link provided to access the right page for activating your free trial.
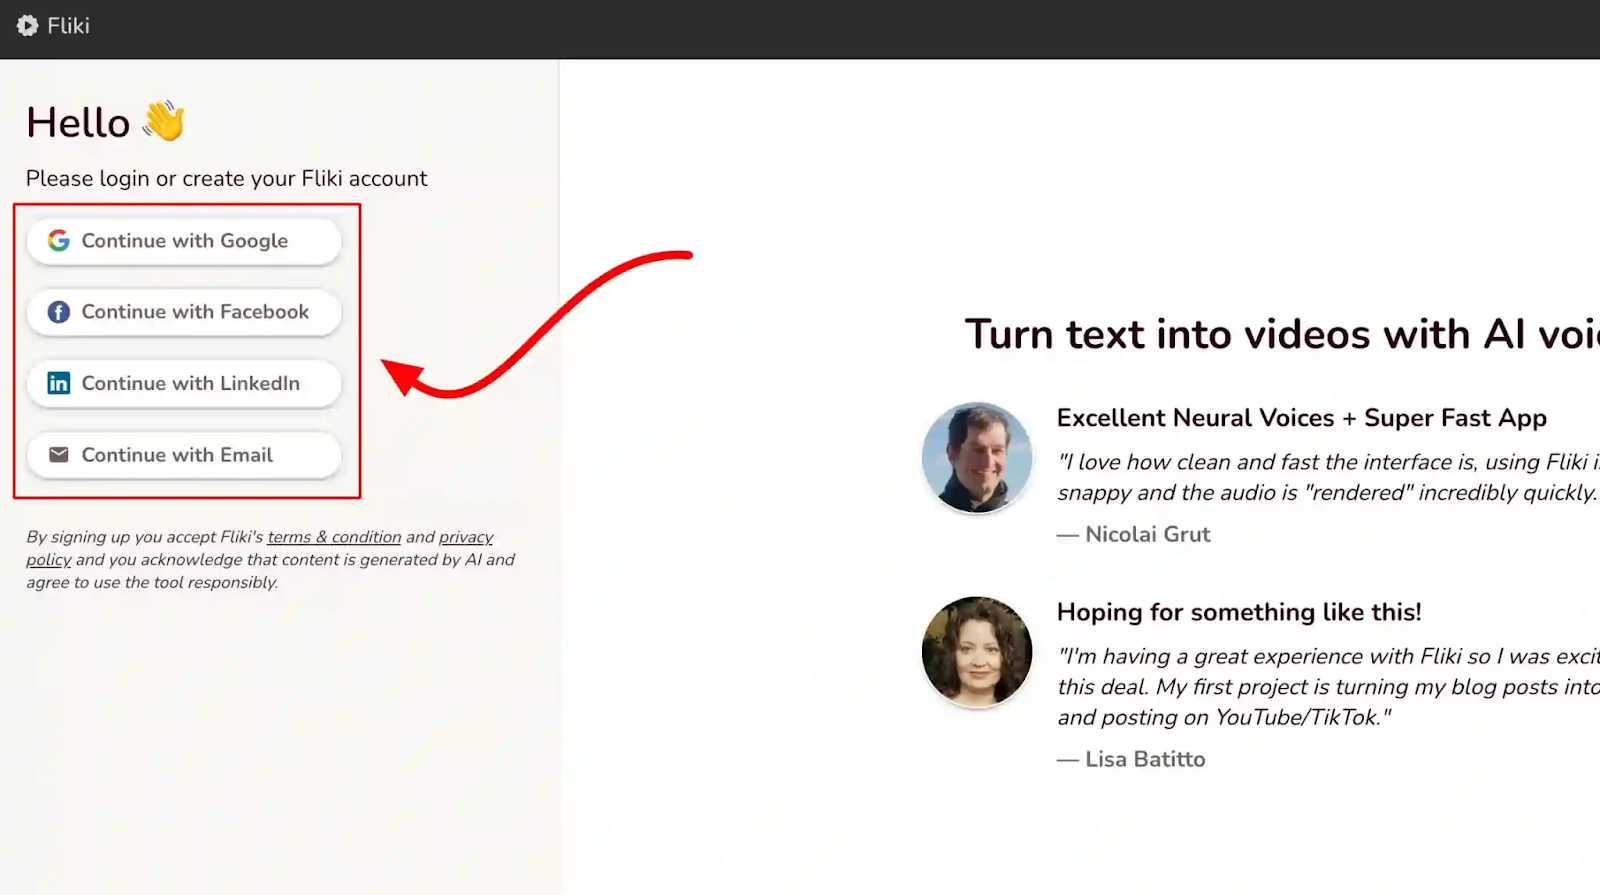
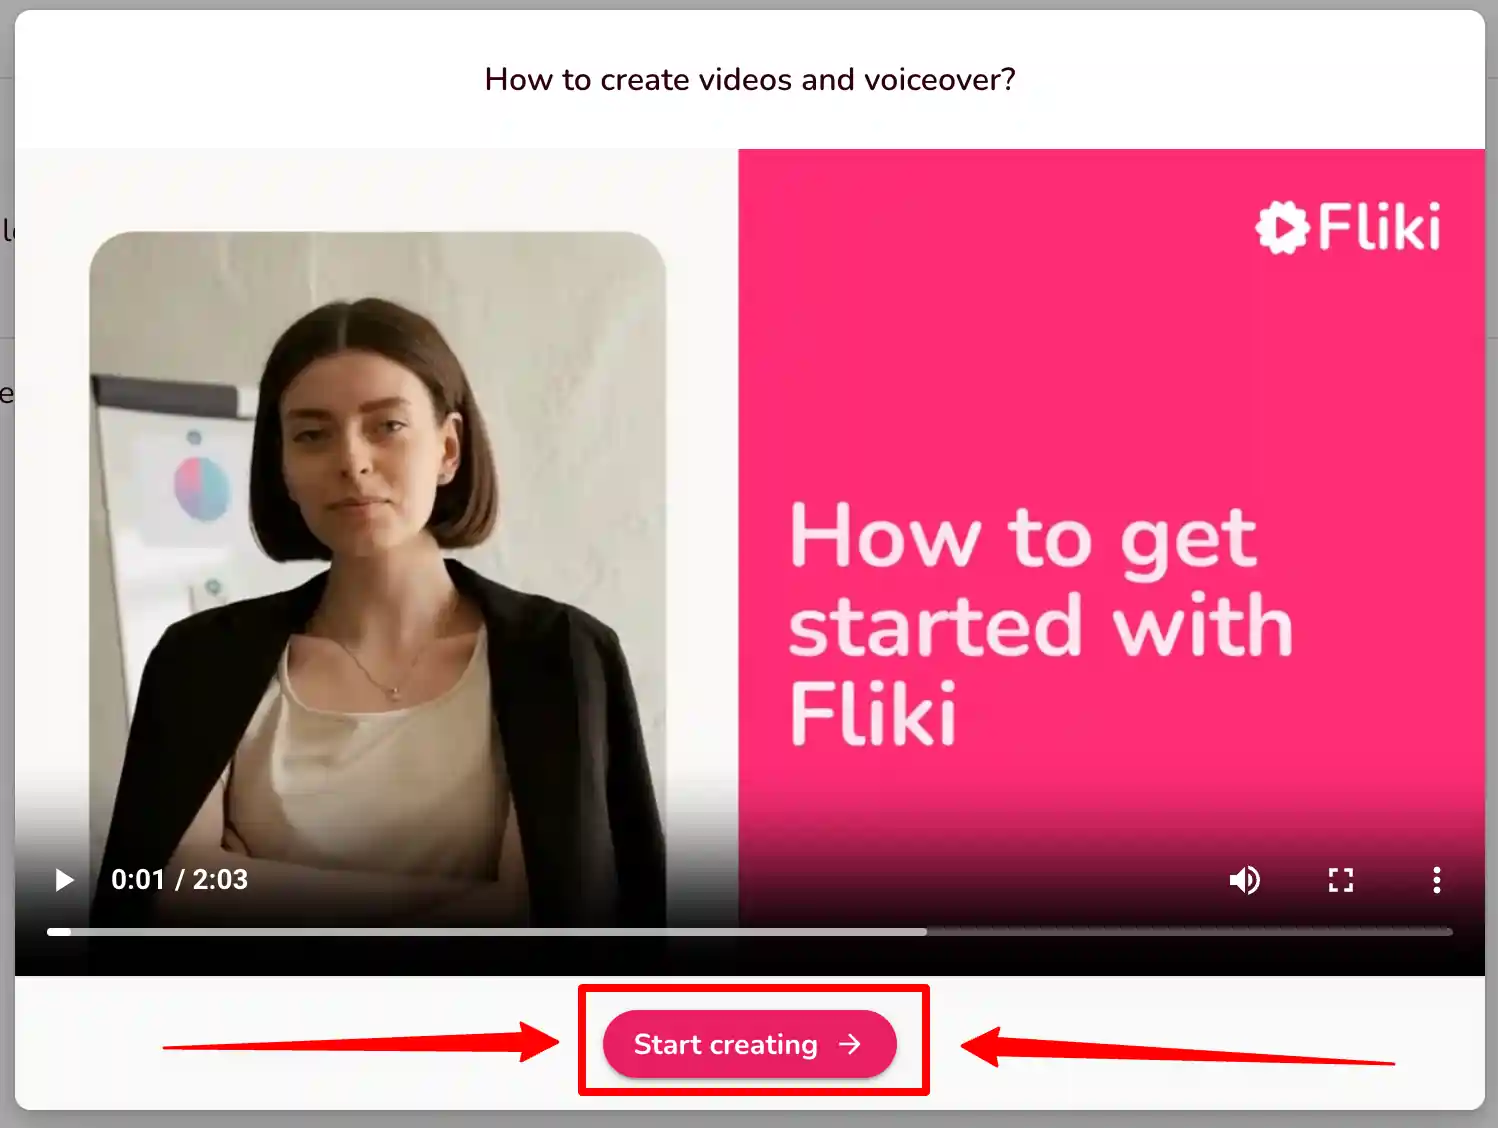
Step 2: Look at the picture below and tap the “signup for free” button.

Step 3: On the left side, you’ll see options to either log in if you already have an account or create a new account. Choose one and sign in.
Step 4: Click the “start creating” button.
Congratulations! You’re all set to use Fliki AI’s Free Trial without any charges.
The best part is, you don’t need to provide any credit card information to activate the free trial, and there’s no limit to how much you can try it out.
The Power of Fliki AI Features:

Effortless Text-to-Video Conversion: Fliki AI streamlines the process of turning your written content into captivating videos. Simply input your text, and Fliki AI works its magic by generating engaging visuals that complement your message.
Natural Text-to-Speech: With its advanced text-to-speech capabilities, Fliki AI offers a range of natural-sounding voices to choose from. Your content will come to life with human-like intonation, making it more relatable and engaging for your audience.
User-Friendly Interface: Fliki AI boasts a user-friendly interface that requires no technical expertise. It’s designed for everyone, regardless of their familiarity with video editing or audio production.
Customization Options: Customize your videos with a variety of styles, fonts, and layouts to match your brand’s identity. Tailor your content to resonate with your target audience effectively.
Library of Visuals: Access a vast library of images and animations to enhance your videos further. Fliki AI ensures that your content is visually appealing and professional.
Founder’s Vision: Empowering Content Creation
Behind Fliki AI’s innovation stands Sabir Ahmed and Atul Yadav, visionary entrepreneurs who recognized the need for simplifying content creation.
Their vision was to provide individuals and businesses with a tool that democratizes multimedia content production, enabling anyone to communicate their ideas effectively.
The founder’s dedication to democratizing content creation aligns with Fliki AI’s core mission: to break down barriers and empower people to share their stories, products, and knowledge through visually appealing videos and compelling voiceovers.
Unlock Your Creative Potential: Start Your Fliki Free Trial
Experience the magic of Fliki AI firsthand by taking advantage of the free trial.
This risk-free opportunity allows you to explore the features, create your own videos, and witness the transformation of your text into engaging multimedia content. Embark on a journey of seamless content creation with Fliki AI today!
Conclusion: Fliki AI Free Trial
In a world where content speaks volumes, Fliki AI emerges as a game-changing solution for crafting impactful videos and voiceovers effortlessly.
With its intuitive interface, versatile features, and commitment to democratizing content creation, Fliki AI empowers both seasoned creators and novices to share their narratives in a captivating manner.
Don’t miss out on the chance to explore Fliki AI’s potential
In the realm of smartphone customization, the ability to adapt even the tiniest details can significantly enhance your digital experience. The size of your keyboard, for instance, plays a crucial role in your typing comfort and efficiency. Samsung, a pioneer in user-centric innovations, has provided a solution that allows you to tailor the keyboard size according to your preferences. This guide will walk you through the steps required to seamlessly adjust the size of the Samsung Keyboard, putting the power of personalization in your hands.
By exploring your device’s settings, you’ll uncover the means to resize the keyboard, whether you’re looking to maximize screen real estate for larger keys or seeking a compact layout for one-handed usage. Whether you’re a swift typist or someone who values precision, this functionality empowers you to fine-tune your interaction with your Samsung smartphone. Join us as we delve into the intricacies of resizing the Samsung keyboard, and unlock a new level of comfort and efficiency in your digital communication.
Adjust the size of the Samsung Keyboard
- Open the Settings menu, scroll down, and tap on the General management option.
- Then, tap on Keyboard list and default.
- Now, click on the Samsung Keyboard option.
- Here, scroll down and tap on Size and transparency.
- Finally, you can drag the handles on the sides of the keyboard to adjust its size.
We hope that this article has been able to provide you with some helpful tips and tricks for How to adjust the size of the Samsung Keyboard. Now you can share your experiences or capture important information without any hassle!